Sunday 20 November 2011

Developing the veg patch from scratch - literally!

Mr. Rooster crowing for his breakfast
Time sure does fly sometimes.. it just struck me that we are in December!!! The photos for this post were taken in November... ahh well... been busy. *blink blink*..

Coming along
One circle planted/sown, the dome on the second circle. We have moved that now to a new location, and the second circle is also planted/sown and mulched.. also we have made two raised beds, the one has Mielies (corn) and beans, and the other has Raspberries. We have positioned them such that in time as the veg patch develops then we can extend them and maybe even join them somehow.. Father time will help us decide what is best, and how. :)

Nuther raised bed - for Raspberries... Yum!!
For now though we are enjoying seeing the lettuces coming up, we have some onions in and sweetcorn, and pumpkin (self sowers from last season which we are going to allow to finish before we put a dome on that spot), some tomatoes and cucumbers in tyres, some pineapple plants (exciting!), lots of strawberries (which we don't want to move just yet either), some beetroot, potatoes, horseradish, radish, comfrey, some herbs and a few other things. 

We are at this stage still exprimenting which we develop the new permaculture layout, but are already very excited to see the potential which is unfolding as we go along.. we will be turning the shadehouse, and extending a small section to excorporate a small fruit orchard for which we have some peaches and a plum. We also have some old apple trees, which we need to thin out, and then only keep one of two which we will help along a little.. Our Biogas reactor is now producing gas, and the effluent water from that we are starting to use on the trees and shrubs in our garden.. we also have a worm-bin going. The way things are now we produce very little waste, basically all of our organic waste goes either to the worms, the chickens or the digester. What ends up in the bin is packaging etc. We recycle all newspaper, and most of the plastic bottles.. so here's to going green! <3 I hope that in 2012 we will be able to reduce our waste even more.. :)


Up to date at last with news from the garden

Cherry tomatoes in a bottle - hopefully.. 
So where are we actually at now time wise with this blog..? November? Ahh.. :)

Okay - what have we done. Well for starters we are continuing our permaculture journey by incorporating other ideas into our garden, and even bringing some of the veg into what we consider to be Zone 1, which is the immediate area around your house.. in a manor of speaking the veg patch is a Zone 1 as well seeing as this is adjacent to the house. Never mind - the more the merrier!
Rhubarb in a box

Our..errm basin planter..  :-P
So for starters we moved the planting boxes/raised beds to the front garden. I have used the one for a rhubarb crown that I had grown from seed, and nurtured carefully ever since. This rhubarb with its new semi-shade spot has now exploded into a very nice looking plant, and I am very excited about having rhubarb in my garden. I grew up with my Gran's glorious rhubarb that were so huge the leaves were the size of an open umbrella!! And I also love what you can do with it. :) The other box now has a flowering creeper in it which will compliment the Wisteria on the otherside of this afdakkie (Afdakkie = a covered area where you can sit). We are also still using tyres and other crazy objects to create interesting and/or useful areas in the garden. Like our basin planter in which I have sowed Petunia seeds, and the tyre next to that has Calendula seeds in it. These are coming up now..Yay!

We have also sown some cherry tomato seeds in adapted 5l water bottles. I find that this is a nice way to recycle them, and thereby create less waste.

Our SA prayer flags

Our afdakkie.. :)
Recently on a trip to Timberlake, between Wilderness and Sedgefield, with two very good friends, I found these South African prayer flags which I thought were quite cool, and since they appealed to my pagan self, and could even work for anyone else of any other faith I thought they would make a nice addition to the wind chimes and fairies in our garden. I have plans to add even more objet d'art of that nature as we go along. Some might think we are hippies, but you know what - I don't really care! My garden makes me happy, it gives my kids pleasure, and we enjoy being in it with all the points of interest, and the dare I say ethereal sounds of the chimes around us.

We have an abundance of bird life, and we actually spotted a Paradise Flycatcher the other day in our Pepper tree.. very shy little creature, but oh so pretty. As you have probably gathered by now, I am a fan of pretty, of flowers and flowers with uses, and also of the quirky. Who knows how the garden will develop in time. For now I am loving it just the way it is. :)


October 2011 - Getting our groove on with Permaculture

The infant stage of our new veg patch
Quite a lot has happened since the actual date of the last post.. As I mentioned in an earlier post, we had gone on a Permaculture course over a weekend in September at the Outeniqua Trout Lodge which was hosted by Permaculture South Africa's Hazel Mugford. And she has a reputation of note, and comes highly recommended!! So we went to gain insight into what we were doing wrong, and what we could do to create the change we wanted to see in the veg garden.

Our first circle with it's keyhole
We had the previous year failed miserably to plant/sow anything, and had a huge mole problem.
We have since found out that the stones we used to create nice raised beds etc, were actually attracting the moles, so that was change No 1 - getting rid of all the stones in the veg patch. Having done this where we started with the new layout, we have seen that the new part is now mole-free. Yay!! 

Jan digging the keyhole
Problem No 2 - creating a layout that would work not only with the domes, but also for us, and still be kind of pretty. So we decided on a kind of S-curve in our patch to accommodate the septic tank and run-off, as well as a tree that we had planted last season. 
We will also be doing the raised beds that we were shown, using sheet mulching, cardboard and manure. So we have a very infantile start at this time, but hopefully in time and as we progress with the moving of the dome the structure will come into its own, and we will end up having a fabulous veg patch with good yields, and diversity. :)

Our permaculture adventure has just started, and it is indeed one which we will continue on in more ways than one. Having done the course has been a true eye-opener for us. We are still very keen to do a mushroom course with Hazel as well at a later date, seeing as we have quite a few wild mushrooms here around Autumn and would like to know more about them, as well as how to maintain a mushroom yield, and perhaps even develop that into a supply. Making the changes we want will take time and dedication to the cause, we are prepared and well equipped now to make them, and I for one am really excited to see and document how our veg patch and garden develop in time. :)

October 2011 - Major Domos for the chickenos

Basic dome structure
So after having been on a very inspiring and life changing Permaculture Course the weekend prior to this, we decided we had to try and build our own chicken domes.

This decision came about because we could see that the chickens we had in the wooden tractor weren't thriving as they should despite having plenty of greens to scratch, and being given extra mielies as well. So off we went to get materials for a dome. This is what we bought for a dome with a 2m diameter:


With a door
6,5m of 50mm irrigation pipe for the base
3 lengths of white 20mm conduit pipe
8m of 20mm irrigation pipe (this will be enough for the center ring plus the door. You must size the center ring to fit more or less halfway down the dome)
1 x 50mm connector piece for base
1 x 20mm connector piece for middle ring
4 x 20mm elbow connectors for door
10m ogies draad or jakkals draad
Bind draad for the shade cap
4m shadecloth for shade cap
Large cable ties and small cable ties
20mm wood drill bit. 

the completed dome - wire and all
With the materials listed here we were able to build one dome, clad it with ogiesdraad (chicken wire), and make a shade cover for the top. I have to add though that getting the chicken wire to fit nicely is rather tricky, kind of like trying to clad a cylinder but keeping within the physical constraints of the wire at the same time.. not easy. Basically to clad it neatly one has to cut wedges into the chicken wire and then overlap the pieces so that the wire is neat at the bottom, but overlaps at the top by about 15-20 cm.

After this we moved the dome to the veg patch, and designated a spot for the dome to be. We then build a ladder out of droppers/sticks for the chickens to roost on, and this was placed inside along with water, and a box for the hens. The best box, we heard from Hazel, was the rear end of a lawnmower.. and by jove it works like a charm!. We have moved Mr. Rooster and his two hens, Kleintjie and Squeak to the dome. They are happy there, and Kleintjie has started to lay eggs. We are still waiting for Squeak to follow suit, but she is not a typical chicken.. lol.  


Jan showing how the door works.

September 2011 - Biogas reactor Building day

Jan and Jan measuring the size of the hole
Stage two in the Biogas reactor project happened by chance, otherwise we would probably still not have finished it. We had gone to Uniondale for the monthly market, and went to say hi to Rico who owns the Little Theatre Cafe.. anyways, who do we meet there? Jan and Anel Burger from the Kammanassie. Now we had met them before, and we had told Rico about the Biogas project thing, and he had sort of spread the word fare and wide in the meantime..

Discussing plans
That being said, we ended up standing in Rico's kitchen discussing the reactor with them all, when Anel quickly decided that they needed to come and learn more. So a date was set, and she would bring a picnic and two extra workers. We just had to explain how it works etc.. lol. So on the 20th September 2011 they arrived at our place early in the morning, and very quickly everyone was working except Anel and myself who are both pregnant.. :)
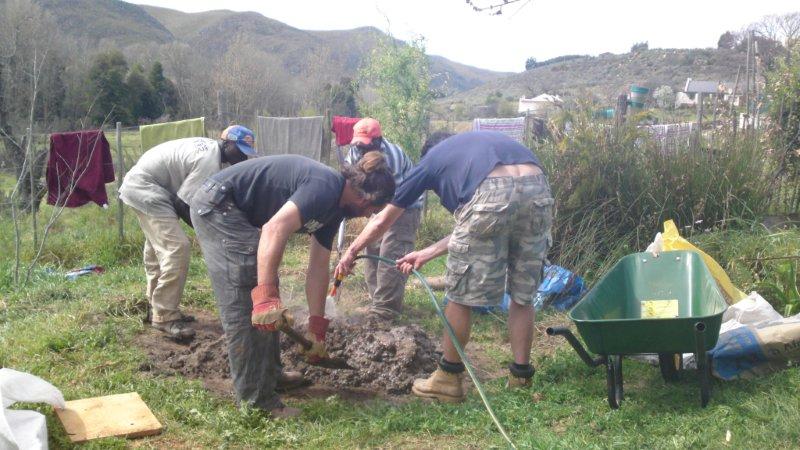
Mixing cement


The dimensions of the hole for the reactor was measured, we had acquired a whole bakkie load of hob-house bricks, sand, cement and gravel, and the men set to work on building the walls of the reactor (the actual pit that the bag would go into). Very shortly after that, the two extra workers had started to mix the cement for the walls. I don't think I have ever seen cement mixed so quickly.. :) Benson and his friend were super efficient!

Jan and Jan trying their hand at mixing cement

In fact they made it look so easy that Jan and Jan wanted to try.. It was mixed in large batches, and shovelled into the wheelbarrow, and then tipped into the pit, trying to get as much as possible into the open cavities of the bricks.. I think they all had lots of fun doing this... kind of like little boys playing in the mud. hehehehe.... Anel and I in the meantime got some refreshments ready while we chatted.


Eish!! Is heavy...

But carting cement like that in a wheelbarrow can be hard work on the arms, and trying to aim into the right place even harder.

Jan and Jan would continuously check that everything was level as they went along, although with the pit consisting mainly of clay and it being rather difficult to do anything about the uneven edges they had to make do in some places.

How we work in South Africa .. 


The bricks were laid thick and fast, and while Jan and Jan were checking levels, Benson and friend would supervise.. lol.

Happy chappy!

Positioning of the outlet.. or the inlet.. :-|

They somehow managed just fine though, and within a couple of hours the walls were done and the bricks were finished.. Of course the actual height of the reactor walls were short a couple of rows, but since we ran out of bricks they had to just finish what they could.  Then it was time to cast the floor of the reactor. Concrete was mixed continuously, and poured into the pit, after which Jan and Jan would spread it evenly and level it.

Leveling the floor of the reactor

By the time they were done with that they were very pleased with the work done, and we all broke for lunch. Anel had really packed a wonderful basket of goodies, so Thank You Anel for that. <3

Admiring their work :)
We all enjoyed what was given to us, and for the light conversation. It was such a lovely day actually, cause not only did they help us with something that had been a headache for a while, but it was an opportunity to get to know them better, which was great for us as well.

Late that afternoon, they packed their bakkie, their worker and off they went the experience richer, and us .. well we stayed but just so an experience richer.

So next time we will be at their farm in the Kammanassie, and then I am sure we can return the favour. :)

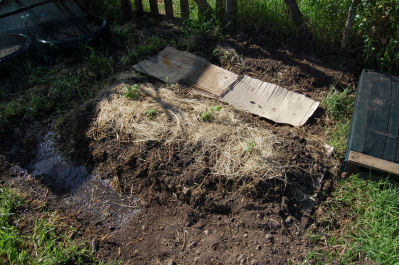
The pit as far as it would be completed this time round.

So till then - 
Thanks Anel and Jan for being so determined to learn, and contribute even though you hardly knew us from a bar of soap at the time. It really was an awesome experience for us, so thanks for giving us the opportunity to get to know you both better as well. <3

We have since completed the reactor pit, and placed the bag in, and connected it to the one toilet. We have also added manure, and dog poop, and grass clippings.. so we just wait now for the little bugs to actually realise that there is plenty of food for them now so they can start producing gas. We have already got small pockets of gas, and have just recently tested it using a special two plate stove... but more on that another time.. hehe.

Tuesday 8 November 2011

September 2011 - With a pluck pluck here...

As mentioned in a previous post we had to slaughter Nandos.. he was really being picked on by the other chickens. First by Colonel Sanders in the tractor, and then by all the other chickens once we introduced him back to the flock..

So hubs killed him using the method as described in John Seymour's book "The complete guide to self-sufficiency" which up until recently we had really been using, and had committed to. And I say that with a hint of sarcasm, for the book, in many ways is really helpful, but there are some chapters which could have been extended to include hints and tips, as well as a more in depth description of just how things should be done.. we have had to learn this the hard way, and unfortunately it started with Nandos.

So anyways, Jan had killed the poor chicken, and de-gutted him, and I said I would pluck him... little did I know that this would be a rather arduous task, but pluck him I did... and it took forever!!

So this chicken has been a learning curve for us, and we have subsequently slaughtered more chickens (roosters who were superfluous), and have done this in a more humane way, after which we dunk the bled, and dead chicken into boiling water, and then pluck. This method we saw on a Permaculture video on You-tube from a farm in the States where they use this method too. It involves holding the chicken upside down, as this prevents them from flapping in panic, and then cutting the main artery in the throat, just under the beak. Once the chicken has bled out you insert the knife point into the mouth and up between the eyes, this will destroy the nervous system and prevent spasms and flapping.. after this you dunk the chicken in the boiling water for about 3 minutes, and then pluck. The plucking is much faster, and the whole process must simpler, and the chicken is nice and clean once gutted and plucked. You can see the process here for Part 1 and below that for Part 2:


August 2011 - To veg or not to veg..

Checking the chickens..
To veg or not to veg that is indeed the question, or at least it was at this point in the game.. :-)

With the new tractor in place we were wondering just how to tackle the veg garden this year, but hubs insisted that we at least try to get some sort of crop out of it, or else we would proverbially die trying..lol. Last year was not so great due to an mole infestation, and of course this demotivated us from doing much at all, but we did realise that no matter what the garden would need a major overhaul this year. And so we tried tentatively with some new things and some old things too.
Our radish spiral
Little did we know at this stage that once we had met Hazel Mugford, everything would change. On a side note I was attending the Uniondale Crafts market and this is where we ran into Hazel and Naomi who also have a stall there. Naomi and her husband run the Outeniqua trout lodge down De Vlugt way, and Hazel and her partner and son stay on the farm too, and offer Permaculture courses... but more on that later.. :-)

Rosemary gone wild. :-)
For now we had to make do with a very dishevelled garden, and had to make a plan to at least get it into some workable order.. so we sowed lettuce, and some other sundry crop items..

And things were still not going according to plan.. the chickens weren't really happy (due to the fact that there were two roosters in the tractor), and the moles were still here disrupting the soil, and then we had what seemed like the whole Haarlem population of slugs and snails.. so we lost out lettuce crop to them, and everything else was just   blegh to look at.. and seemed like it was going nowhere.. the only thing we managed to enjoy was the radish.. but then again you don't need a degree in gardening to be able to grow them.. lol.

Everything really needed a rethink, we just didn't know where to start...

August 2011 - Its Spring...almost.

The garden waking up from a winter slumber
So as August was trudging along at a very cold and slow pace, we began to notice how despite the freezing temperatures, the garden was starting to slowly awake from its hibernation. Its never ceases to amaze me how nature works, and the wonders unfold in her own time and pace.

We had a very cold and long winter this year, and at some point I was beginning to think it would never end. Yet..
A weaver spying out the Apricot blossoms


When it happens, its like an explosion of colour and smells. The air was filled with the sweet scent of apricot blossoms, and everytime we walked across the stoep, and the breeze floated by, so did the smell of spring.

I would like to dedicate this blog entry to the season of Spring, because it truly is a wondrous time of the year. So to do that I am adding a poem that I wrote a couple of years back.
Our morning coffee spot on the stoep.


Spring is approaching
Like a quiet dream
Colours exploding into reality
Making the senses dither
The glow of the sun bringing joy
Across the infinite field of life

The rolling landscape bringing the message of life
Being filled by the coming harvest
That numbs our hunger for the things
We cannot achieve before the end of time. ;-)


August 2011 - Chicken tractor part 2

Cladding the tractor
So on this the second bit about the tractor we built, we have managed to clad the one side of the "house". We used builders plastic for the underside and for waterproofing purposes, and then we recycled our feedbags for the outer cover.

This seemed to work very well, and for the front and back we just used builders plastic and planks. We had some old boxed which fit perfectly, and so we used these for the nesting boxes.
The nesting boxes
On the back end we made a door for easy access to any eggs and also to clean the nesting boxes. We also put in a second floor for the rooster, and added a nice log with branches on it for him to climb up. So we actually used mostly off cut bits of wood for the whole construction, and bought very little extra, except the hinges and latches for the doors, and the chicken wire, which we actually had from a previous project. :-)
Our building inspector
Gizmo decided it would be a good idea to test the nesting boxes were comfortable, and big enough to actually fit a hen..lol. We then put the doors on and that was pretty much it, construction wise. We places some sawdust in the nesting boxes, and added the three hens and rooster.... or at least what we thought was three hens and a rooster, which actually turned out to be two hen and two roosters.. Needless to say, poor Nandos was beat up by Colonel Sanders (the darker and smaller of the two at the time), and ended up with a featherless neck, poor thing.

The completed tractor, chickens and all.
We subsequently decided to remove Nandos, and add him to the other flock. But this did not go very well either. The poor thing was an outcast, and was just being bullied by everyone, so we slaughtered him.. and I have to add he made a very good chicken curry.. hehe.

We also decided to sell half of our KoekKoek flock, and these were snapped up by a friend of Hazel Mugford, who does Permaculture courses. He was very happy with the purchase, even though it turned out that he ended up with 6 roosters out of the eleven chickens that he bought. These all live in Kirkwood, near PE/Uitenhage now and are part of a Permaculture setup there. :-) I have to also just add that the KoekKoek is an excellent scratcher, and egg layer. But more on that later..

Happy chickens..

Monday 24 October 2011

July 2011 - The solar cooker

Our solar cooker
Now I ask you - what homestead is complete without a solar cooker?

We acquired one in June, but actually only had an opportunity to try is in July due to rain, rain and more rain... but we should not complain though seeing at it benefits all of our gardens, and the wild flora as well.

But the day finally came where we had glorious sunshine, and promptly decided to try our new solar cooker. So .. Jan found some chicken pieces, some random veg, and placed everything in a glass casserole. This went into the cooker with lid on, and then we just had to let father sun do his job. :-)

Our casserole in the cooker
The notion of not having to do anything at all to cook a meal was quick strange, and initially we would check the cooker very 5 or 10 minutes just to see if it was actually working. We soon discovered though that cooking food this way takes longer than an oven, and we then left it.

Jan checking our lunch

 It was still all rather exciting though, and we discussed it at length wondering what a solar cooked meal would taste like even..

About 2-3 hours later after having checked the cooker probably a hundred times in between, and having watched it slowly start to simmer, and emit the most amazing smells, we took it out of the cooker. But I have to add, that this thing is super efficient, and even though your food takes longer to cook, the steam and heat created inside is very very hot!!

Our chicken casserole
So we had our chicken casserole for lunch, and boy did it taste good. The flavours were so pure, and untarnished if one can say say that about food. It was a nice simple dish,with a lovely flavour... definitely worth the investment, and definitely something we will do again once we have more sunshine days. :-)

July 2011 - Chicken progress..

Many happy chooks
Mid winter came along, and the chooks were thriving, getting fatter and growing to be lovely birds. But there was one problem... we had waaayyyy too many. This led us to think that we would have to make a plan to either separate the flock, or start slaughtering, or sell some of them..

They all still looked very much alike though, and being new to the whole chicken farming thing we could just not tell them apart, except for two very definite roosters.. :-| I have to add though that even though we knew that there was too many, we really have taken a liking to the chickens being on our smallholding, and enjoyed the interaction with them just so.

One of our Buff Reds


Always happy to get fed
The chook house complete
We soon decided that what we needed for our chickens, or at least four of them, and also for our veg garden was a chicken tractor. And after much research in Permaculture books and on the net we soon found a host of different tractors to choose from. We actually ended up choosing one from what we consider to be the bible of sustainable living: John Seymour's Complete book of Self-Sufficiency. But since there were no dimensions mentioned in the book, we had to find some on the net. But more on that later... :-)

Jan fitting and adjusting for the handles.


Friday 21 October 2011

July 2011 - First dig for the digester

Marking out the pit for the Bio-Digester
Trying to live a sustainable life comes with ups and downs, trials and tribulations. It comes with a host of decisions to be made about which practice would be a "green" one, and which solutions one should implement in order to have as little impact on the environment as possible. Since we have always had an interest in doing the "green" thing, it seemed logical to get a bio-digester for our own black water, and animal waste and other waste which would be good for this purpose.

Just checking the measurements..
Finding a location for the digester was quite a contentious issue, with many discussions, and pro's and con's etc, but we eventually settled on a central spot just beyond our Apricot trees. Jan diligently started marking out the size, and location of where the pit should go, and Rene, who is always short of pocket money, decided that he would do the ground break. So both set to work early in the morning, and the situation soon turned into a worker/foreman relationship...hahaha

Rene happy to work..
But nevertheless, the digging started, and Rene was very gung-ho to actually do a good bit of work. And he actually did a good initial trench which was about half a meter wide by half a meter deep... Good job!! He could not finish though, as Sunday rolled on, and it was back to hostel, and work of a different nature. :-) But he dig the initial dig, and created a good  start to the worker who came during the week to finish the hole.

Rene digging for China.. hehehe